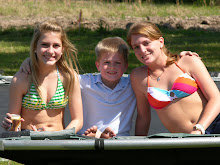
This was my layout from our latest Design Team assignment.
I was given 2 sheets of purple Coordinations paper and a bottle of purple Smooch. I have to say I enjoyed this months challenge. I had never used Smooch before but have to say I really like it.
The Challenges I met were:
1. Use punched out circles in your design. My cirlcles are out of different patterned fabrics. I cut them out and then sewed around the edge with a zig zag stitch. There are 3 in the cluster at the bottom of the large photo, one on the left side of the photo, and one at the top.
2. Use Smooch 3 different ways. I stamped flourishes onto the lavendar Coordinations paper (making it a print) using several different shades of Smooch. I painted designs on the white buttons with Smooch. The petals on the small prima flowers are accented with Smooch. The Charm that says Together Forever (next to the heart) and the floral charm in the cluster at the top next to the canvas tag is colored with Smooch. The flower on the canvas tag was painted with Smooch. It was originally orange and yellow and green. The fleur-de-lis is stamped and outlined with Smooch. The word ALL is painted with 2 shades of purple Smooch (the letters were originally copper). Lastly, the arrow and center of the flower at the top left--on the folded over paper--is painted with Smooch. I guess I went Smooch crazy! Tip---the Smooch takes a long time to dry so I helped the process along by using my embossing heat tool.
3. Use the Coordinations paper 3 different ways. The large photo is backed in Coordinations paper that I distressed and inked. I like the way the paper changes color when you do this. The word MAIDS was cut out on the Cricut in purple using the Jasmine font then shadowed with the black paper and then sanded on just the lower portion. The word was also pop dotted to give it some definition. Lastly I antiqued the lavendar Coordinations paper by crinkling it up and then sanding lightly over it so that just the creases changed color. Cool paper!
4. Create square of rolled edged paper within rolled edged paper. First I tore out a large square from the lavendar paper, distressing and curling the edges. Then I put a smaller square of different printed paper that had been distressed and curled also inside the larger square. I sewed the square down and also sewed aroung the outer edges of the large square.
5. Use 4 prints. By changing my lavendar paper into a print with the stamping, I used 4 prints.
A few other goodies not mentioned above. The heart was made by taking a chipboard heart, putting glossy accent all over it and then pouring a mixture of seed beads that I had mixed up in a small cup all over it. The tip of the 2 pins were originally pearl but I changed the color of them to purple by pouring purple alcohol ink on them. The frame around the small picture on the upper right side of the large photo was originally canvas. I changed it by painting it and then stamped it with a word stamp from Glitz. Whew!